Sauna Ventilation: Intake, Exhaust, and Why It Matters
Some links on this page are affiliate links. If you buy through them, I earn a small commission at no extra cost to you. As an Amazon Associate I earn from qualifying purchases.
Two people can build the same room, hang the same heater on the same wall, and end up with two different saunas. In one, the heat sits evenly from ankle to shoulder and you can stay a full twenty minutes. In the other, the top bench feels stale after ten and your feet never warm up. The difference is almost always where air enters the room and where it leaves.
Ventilation is also the least standardized part of a sauna build. Harvia, Tylö, and HUUM all publish installation manuals, all three are serious manufacturers, and they genuinely do not agree on where the exhaust vent belongs for an electric heater. So before anything else: the manual that came with your heater outranks this page, that forum thread, and the guy at the sauna store. Everything below is a map of what the manuals actually say and where they diverge.
What the vents are actually for
Ventilation does two separate jobs, and they happen at different times. While you’re bathing, the room needs a steady supply of fresh air moving past the benches so the air doesn’t go stagnant – that’s what makes a sauna feel stuffy rather than hot. After the session, the room needs to dry out, because a wooden room that stays damp is a wooden room with a shorter life and a smell you’ll eventually notice.
Those two jobs pull in different directions, which is why many saunas have a third opening – a drying vent that stays shut during heating and bathing and gets opened afterwards. The bathing airflow and the drying airflow are not the same system, even when they share the same holes in the wall.
The electric layout: Harvia’s gravity version
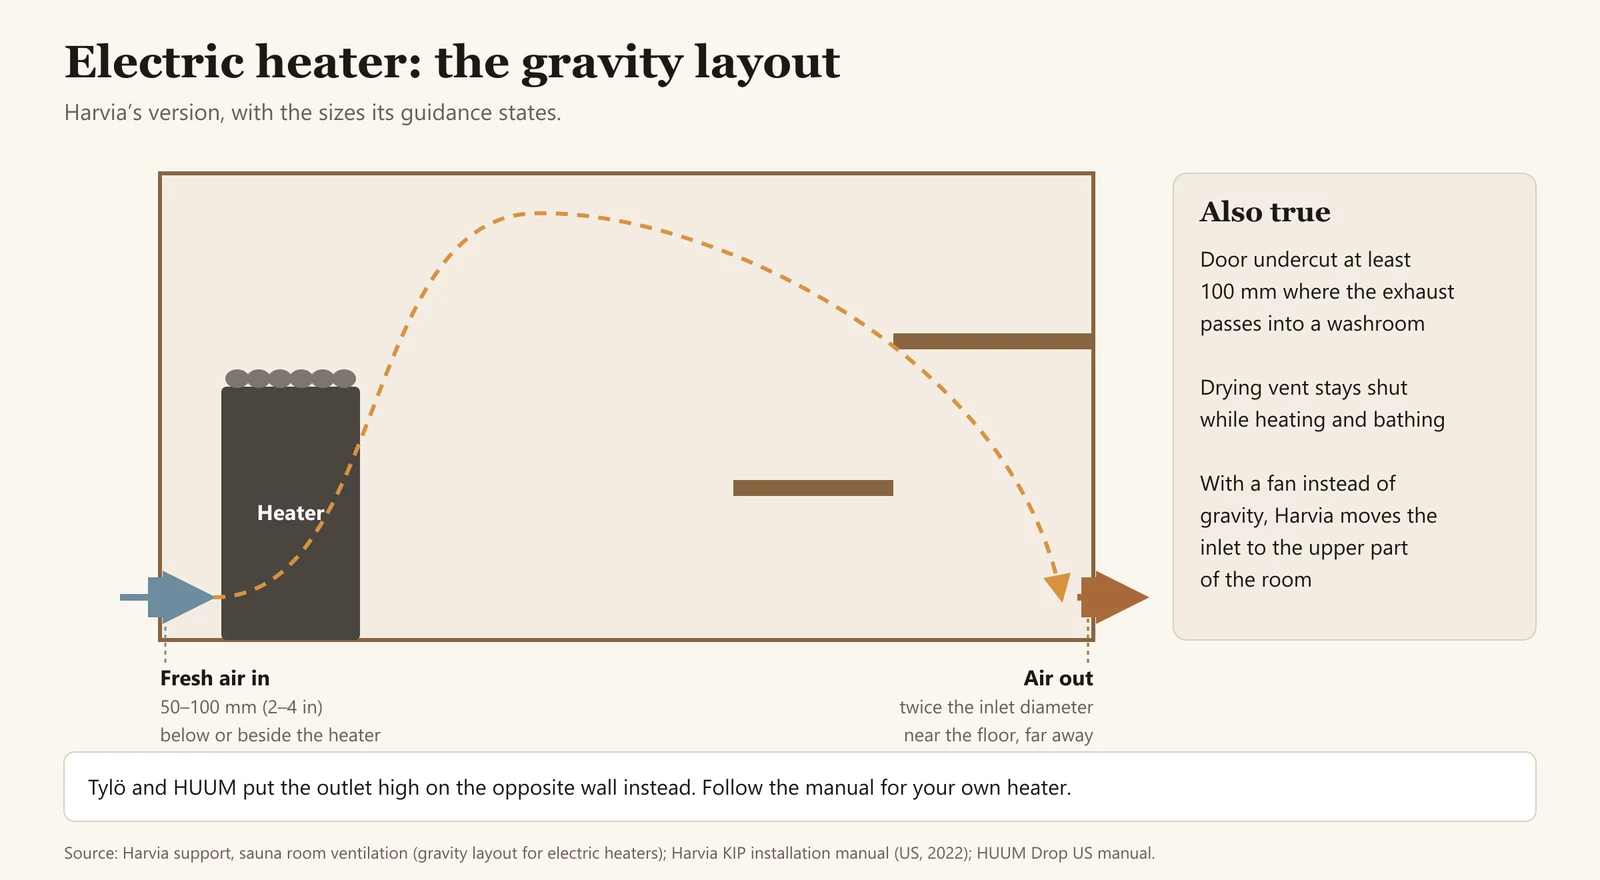
For an electric heater running on gravity ventilation – no fan, just pressure and temperature doing the work – Harvia’s guidance puts the inlet below or next to the heater, 50 to 100 mm in diameter. The outlet goes near the floor, as far from the heater as the room allows (under the benches is the usual spot), and it’s sized at twice the inlet diameter.
The logic is that the heater does the mixing. Cool air arrives at the stones, rises hard over them, spreads across the ceiling, falls down the far wall, and exits low on the opposite side. You get one long circulation loop through the whole room instead of a short hop from hole to hole. The oversized outlet matters here: the exhaust has to move warm, expanded, humid air, and choking it undoes the whole arrangement.
The same guidance is clear that any separate drying vent stays closed while the sauna is heating and while people are inside. It exists for the hour after everyone’s left.
Where the brands disagree – and why it’s not your fault
Here’s what the manuals say side by side. Every figure below is the manufacturer’s own, for an electric heater.
| Source | Inlet | Outlet |
|---|---|---|
| Harvia support guidance (gravity) | Below or next to the heater, 50–100 mm diameter | Near the floor, as far from the heater as possible; twice the inlet diameter |
| Harvia KIP manual (US) | Gravity ventilation: under or next to the heater. Mechanical: above the heater | Near the floor, as far from the heater as possible; twice the inlet’s diameter |
| Tylö Sense Sport (US) | Straight through the wall under the center line of the heater | High on the wall or in the ceiling, diagonally opposite the inlet, same area as the inlet |
| Tylö, elsewhere in its US documentation | As above | Lower than the upper benches, about two feet above the inlet |
| HUUM DROP 2.0 manual (US) | Gravity ventilation: mid-height of the heater or lower (no higher than 400 mm). Mechanical: mid-height of the heater or higher (at least 400 mm) | Opposite wall, no higher than 600 mm off the floor; with gravity ventilation at least 200 mm above the inlet; 100 to 200 mm diameter |
Read that table twice and you’ll notice Tylö disagrees with itself inside its own US documentation – high in the ceiling on one page, below the upper benches on another. That’s not a misprint you should try to resolve with reasoning. It’s a signal that the tolerance here is wider than the diagrams imply, and that heater manufacturers optimize for their own airflow around their own stone mass.
Practical consequence: pick your heater first, then lay out the vents from that manual. Doing it the other way around – cutting holes to a generic diagram and then shopping for a heater – is how people end up with an exhaust the manufacturer explicitly warns against. Choosing a heater is the upstream decision, and ventilation follows from it.
A wood stove inverts the whole thing
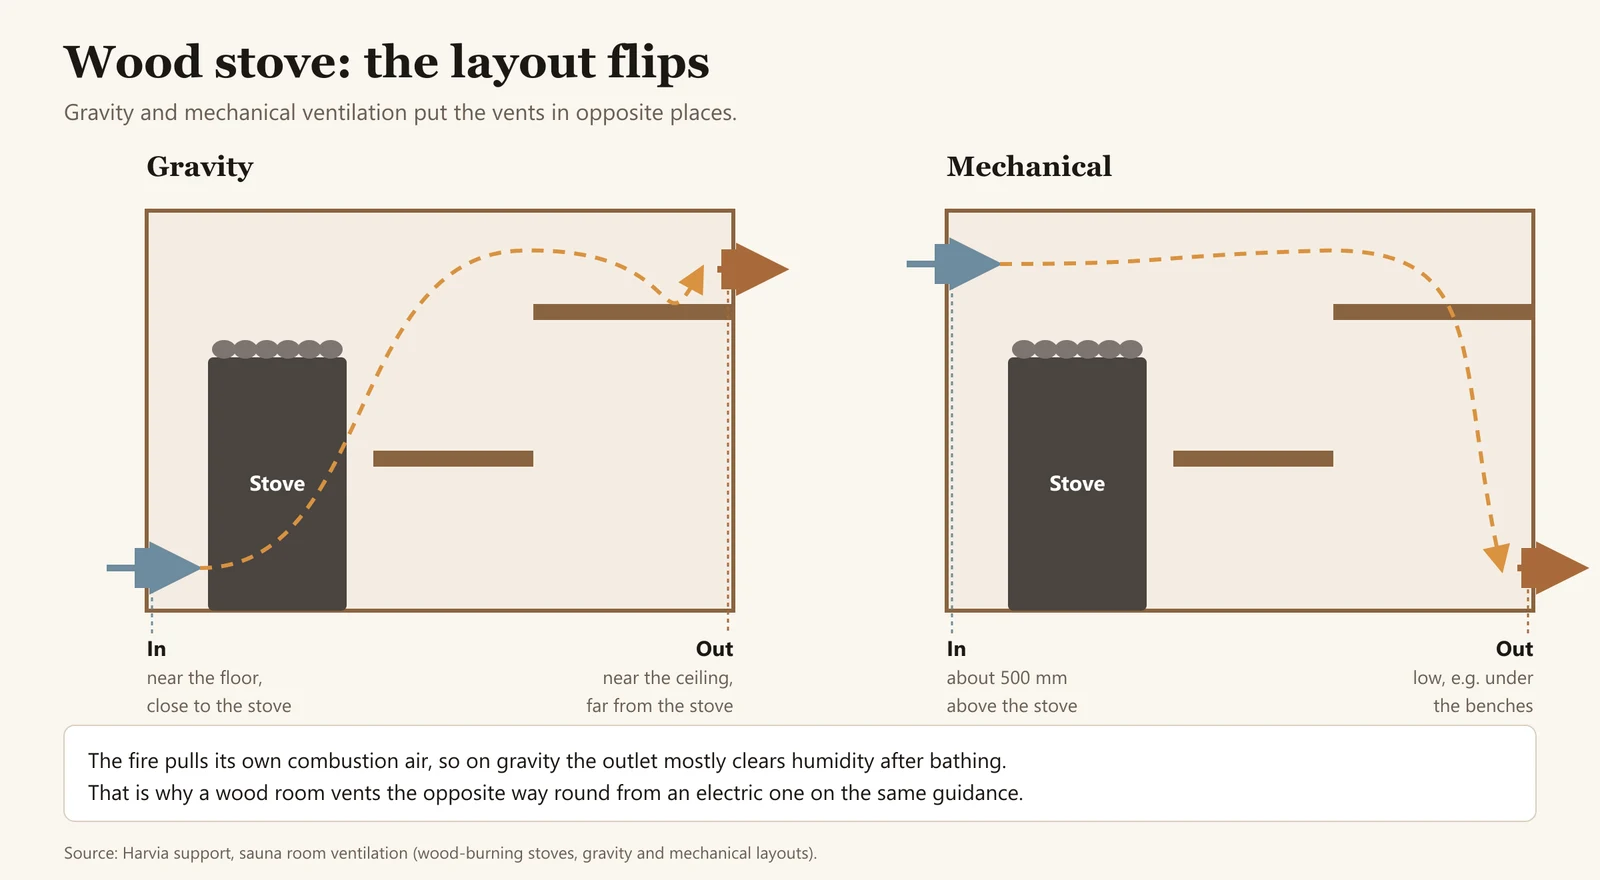
This is the single most useful point on the page, and it catches people who’ve already built one electric sauna. With a wood-burning stove on gravity ventilation, Harvia’s guidance flips the layout: the inlet goes close to the floor near the stove, and the outlet goes as far from the stove as possible, near the ceiling.
The reason is that the fire is now the engine. The stove pulls combustion air through the firebox and up the flue, which means it’s already moving air through the room without any help from the vent geometry. The exhaust opening isn’t there to drive circulation during the session – its main job is clearing humidity out of the room afterwards, which is why it sits high.
Add a mechanical exhaust and the wood layout flips again: inlet roughly 500 mm above the stove, outlet down low, for example under the benches. Four layouts, two heater types, two ventilation methods, and no two of them look alike. The diagram at the top of this page shows the electric and wood-fired gravity versions side by side, which is faster than reading four paragraphs of arrows.
Wood stoves bring a second set of requirements the electric crowd never thinks about – clearances, flue, and combustion air are their own subject, and they belong in the heater installation stage rather than the ventilation stage.
Gravity or mechanical
Gravity ventilation is the default in the manuals: no fan, no controls, nothing to fail. Warm air expands and leaves, cooler air is drawn in, and the heater keeps the loop going. For a typical home sauna this is what the manufacturers assume unless you tell them otherwise.
Mechanical ventilation changes the inlet position, not just the fan. With an electric heater, Harvia moves the inlet to the upper part of the room when a fan is doing the work, rather than keeping it down at the heater. That’s a meaningful change – an inlet placed for gravity flow and then paired with a fan is neither one thing nor the other.
Beyond inlet placement, the manuals stay quiet. Fan sizing, duct runs, and airflow rates aren’t specified in the manufacturer documentation I’d trust for this, so if you’re going mechanical, that’s a conversation with the person designing the house ventilation – not something to eyeball from a sauna guide.
How much air, and how big the openings
On the volume of air, the brands actually converge. Harvia’s ventilation guidance, Tylö’s manuals, and HUUM’s manual all target roughly six air changes per hour – the room’s full volume of air replaced six times in an hour. Harvia’s US KIP manual gives the same figure.
For opening size in US units, Tylö’s US manual gives a formula: for a floor area under 31 ft², at least 9.3 in² of vent; at 31 ft² or more, at least 0.3 in² per square foot of floor. Treat these as Tylö’s stated minimums for Tylö installations and check the numbers against your own manual – the US and metric documents don’t always phrase this identically.
Then there’s the opening nobody puts in a diagram. Where the exhaust leads into an adjoining washroom, both Harvia and HUUM require at least a 100 mm gap under the sauna door. Air has to get into the room to get out of it, and if the door seals tightly to the floor, the exhaust vent is pulling against a closed box.
The mistakes that show up over and over
Four failures account for most of the badly ventilated saunas I’ve seen described, and all four are avoidable on paper before anyone cuts a hole.
- Exhaust placed near the heater. Incoming air goes straight back out without ever crossing the room. The heater cycles, the thermostat is satisfied, and the far bench stays dead. Every manual in the table above puts the outlet on the opposite side for a reason.
- A blocked or decorative inlet. Bench framing built over it, a vent plate that was never opened, or an outdoor pipe buried behind cladding. The hole exists and does nothing.
- The drying vent left open during heating. It bleeds heat and steam out while you’re trying to build both, so the room takes longer to reach temperature and the löyly – the burst of steam that rises when you throw water on the stones – dies instead of filling the room. Shut it while heating and bathing; open it after.
- Trusting a prefab cabin’s factory ventilation. In my experience, US-market prefab and barrel saunas ship badly under-vented – often one small adjustable panel and nothing else, because a hole in a panel is a warranty question and a stuffy sauna is not. If your kit arrived with a single vent, assume it’s the starting point rather than the design.
Ventilation also interacts with the layer behind the paneling. An inlet or outlet duct punches through the vapor barrier, and a sloppy seal there does more long-term damage than a badly placed vent ever will, so plan the penetrations while you’re doing the insulation and vapor barrier and not afterwards. For the sequencing of the whole build, the home sauna build walkthrough puts these stages in order. The North American Sauna Society is also worth reading if you’re building rather than buying a kit.
Common questions
Does a home sauna really need ventilation?
Yes, and for two reasons: fresh air moving past the benches while you’re bathing, and drying the wooden room out afterwards. Every major manufacturer specifies an inlet and an outlet in its installation manual. A sealed sauna will still reach temperature – it just feels stale at the top bench and takes much longer to dry.
Where should the sauna exhaust vent go?
It depends on your heater, and the manufacturers disagree. Harvia’s gravity guidance for electric heaters puts the outlet near the floor as far from the heater as possible; HUUM puts it on the opposite wall, no higher than 600 mm off the floor; Tylö’s manuals give both a high-ceiling position and a below-the-upper-bench position. Follow the manual for the heater you actually own.
Is a wood-fired sauna vented differently from an electric one?
Yes, and it’s close to the reverse. With gravity ventilation and a wood stove, Harvia puts the inlet low near the stove and the outlet high and far away, because the fire itself drives airflow and the outlet is mainly there to clear humidity after the session. The electric gravity layout does the opposite: inlet at the heater, outlet low on the far side.
Should sauna vents be open or closed while bathing?
The inlet and outlet stay open – that’s the bathing airflow. A separate drying vent, where one exists, stays closed while the sauna is heating up and while people are inside, and gets opened afterwards to dry the room. Harvia’s guidance is explicit on this point.
How big should sauna vents be?
Harvia’s gravity layout for electric heaters calls for a 50–100 mm inlet with an outlet at twice that diameter; HUUM specifies a 100–200 mm outlet. Tylö’s US manual works from floor area instead: at least 9.3 in² of vent below 31 ft² of floor, and at least 0.3 in² per square foot at 31 ft² and above. Check your own manual before cutting.
How many air changes per hour should a sauna have?
Roughly six. Harvia’s ventilation guidance, Tylö’s manuals, and HUUM’s manual all land on about six air changes per hour, Harvia’s US KIP manual included. That figure describes total air volume moved, not a fan specification.